2.4.2 Microsoft Azure Integration & Importing Devices
Microsoft Azure Integration & Importing Devices
The Azure device import configurations allow Single Connect to automatically detect active instances in a given region and assign the discovered instances to relevant Device Groups based on custom Azure tags.
The following configuration is required in order to add/discover devices from Azure:
Cloud Integration Configuration for Importing Azure device
- Log in to the Single Connect Web GUI
- Navigate to Administration > System Config Man.
- Set the following parameters
Parameter Name | Parameter Value | Encryption |
|---|---|---|
device.import.azure.client.id | Azure Authentication Client ID | must be set as “yes” |
device.import.azure.tenant.id | Azure Authentication Tenant / Domain ID | must be set as “yes” |
device.import.azure.secret.key | Azure Authentication Secret | must be set as “yes” |
device.import.azure.resource.groups | Comma separated list of Resource Groups (Multiple resource groups should be added with a comma. Ex: azure.kron-rg-1;azure.kron-rg-2) | |
Add/Edit Element Type Properties for Azure Devices
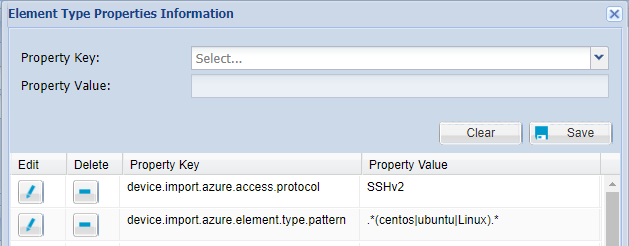
Define the "Element Type" properties shown below, so that Single Connect can identify the OS of the discovered instances.
- Log in to the Single Connect Web GUI
- Navigate to Device Management > Element Type
- Click the “Options” button of the related element type and click “Show Properties”
- Set the “device.import.azure.element.type.pattern”, “device.import.azure.access.protocol”, and “device.import.azure.ssh.username” properties
Parameter Name | Parameter Value |
|---|---|
device.import.azure.element.type.pattern | Mandatory. The pattern can be defined as multiple in one element. This pattern is checked against the “AMI ID” description of the instance in order to determine the OS type. |
device.import.azure.access.protocol | Mandatory. This property is used to determine the default access method for the discovered instances |
Note |
|---|
It is required to define a new Element Type for each OS type in order for Single Connect to auto detect. Ex: CentOS Linux, Ubuntu Linux, etc. |
Add Device Groups for Azure Devices
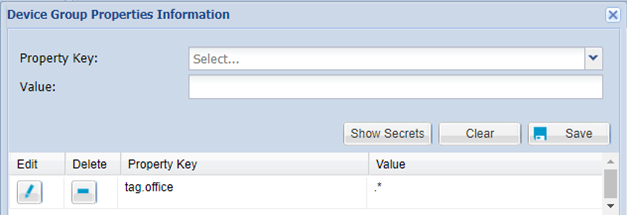
Single Connect imports Azure instances based on their tags. If an Azure instance is to be imported into Single Connect, that instance must have all the tags specified in at least one device group. To create a group with Azure tags:
- Log in to the Single Connect Web GUI
- Navigate to Device Management > Device Groups
- Create a new Device Group, or use an existing Device Group
- Right-click on the Device Group, and select “Show Properties”
- Select the Azure tag property that matches with the devices to be imported.
Note |
|---|
Tag values can be written in regex format. |
Enable Azure Device Import Job
Importing Azure Instances requires a Single Connect Job for synchronization. The job will update the information on Single Connect periodically depending on the cron expression.
- Log in to the Single Connect Web GUI
- Navigate to Device Administration > Job Scheduler
- Click “Fire Job”
- Select “AzureDeviceImportJob” as the job
- Fill the, “Trigger Name”, “Fire Date”, “Cron expression” fields
- Click on the “Save Job” button
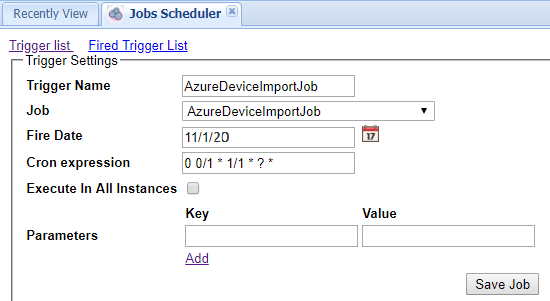
To trigger the job manually, after the job has been fired follow the steps below:
- Log in to the Single Connect Web GUI
- Navigate to Device Administration > Job Scheduler
- Click “Trigger List” and then click on “Trigger as Simple Trigger” for the defined “AzureDeviceImport” job

Azure Device List
To list of imported devices:
- Navigate to Device Management > Device Inventory
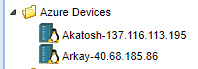
- Azure Devices with specified tags will appear inside the Device Group recently created
Note |
|---|
Azure Instances are automatically synchronized with Single Connect but the Device Realm and the Policy Realm should be set manually for user accessibility to the devices as well as for policy enforcement.(see also: Managing Devices and Policy Management) |
Configurations for SSH Azure Devices
If devices imported from Azure have the required configuration to log in via an SSH key, Single Connect can provide seamless connection to the device via the SSH key. Otherwise, the global username and password need to be defined for each device group. To use an SSH key for Azure devices, follow the steps below:
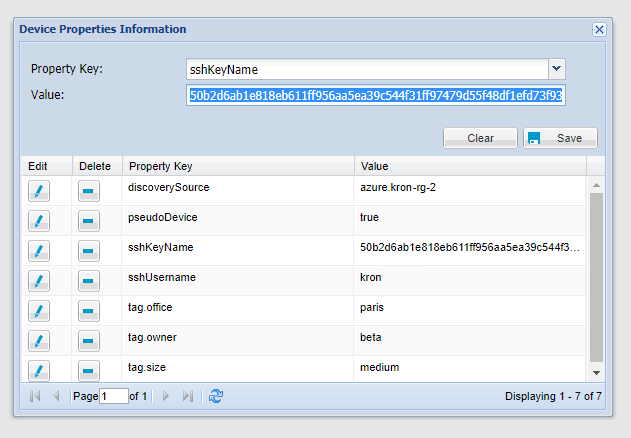
- Get the SSH key name that is stored in the device properties for each device:
- Log in to the Single Connect Web GUI
- Navigate to Device Management > Device Inventory
- Right-click on an Azure Device, and select “Show Properties” (The SSH Key name of the device is stored in “sshKeyName” property)
- Write down the value of this property to be used for the Secret Data Vault module
- Enable SSH Key Connection to Device Groups
- Log in to the Single Connect Web GUI
- Navigate to Device Management > Device Groups
- Right-click on the Device Group in which Azure devices are imported, and select “Show Properties”
- Select the “addDeviceSshKeyToUserSelection” property and set the value as “true”
- Uploading SSH key to Single Connect and enabling connection to the device:
- Log in to the Single Connect Web GUI
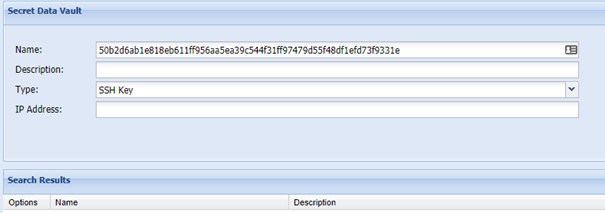
- Navigate to Secret Data Vault > Secret Data Vault
- Fill the required fields (The “Name” field must be exactly equal to the value of “sshKeyName” in the Device Property)
- Select “SSH Key” for the Type field.
- Copy the contents of the SSH key into the Secret Data field.
Note |
|---|
The SSH keys must be in the OpenSSH key format. This means that the value you put into the Secret Data field should start with the “---- BEGIN SSH2 PUBLIC KEY ----” and end with the “---- END SSH2 PUBLIC KEY ----” indicators. |
SSH Proxy Tag Configuration
Please ask consultation from Kron Technical Support [email protected]