2.3 Managing Devices
Devices can be added to Single Connect manually, via an inventory system or via importing from an .xlsx file. The domain determines which method of integration is used.
Element Type
In order to create, delete, or edit elements,
- Log in to the Single Connect Web GUI
- Navigate to Device Management > Element Type
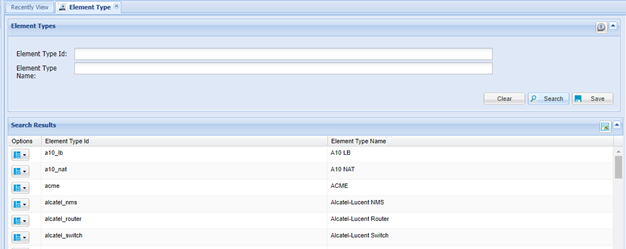
Elements can be personalized by adding or editing properties on the “Element Type” screen. To set the properties of an element type, follow the steps below:
- Navigate to Device Management > Element Type
- Click the Option button of the Element Type
- Select the “Show Properties” option
- Set preferred properties
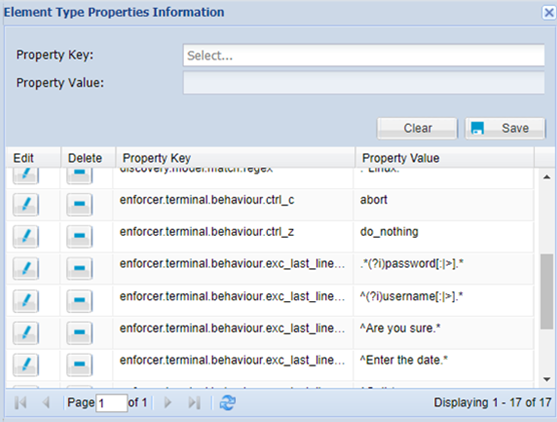
Property Key | Description | Sample Value |
|---|---|---|
aaa.auth.username.case.sensitive | If the device type is expected to recognize a case sensitive username, the property must be set as true. | false |
cli.login.password.prompt.pattern | Telnet connections behave differently during the authentication process based on the device, such as only password or only username being asked for authentication. If only the password is required for authentication, set this parameter. | (?i).*password[:|>].* |
cli.login.username.and.password.prompt.pattern | Telnet connections behave differently during the authentication process based on the device, such as only password or only username being asked for authentication. If both the username and password are required for authentication, set this parameter. | (?i).*username.*password.* |
cli.login.username.prompt.pattern | Telnet connections behave differently during the authentication process based on the device, such as only the password or only the username being asked for authentication. If only the username is required for authentication, set this parameter. | (?i).*(username|user|login)[:|>].* |
discovery.commands.hostname | Command to get hostname during device discovery | |
discovery.commands.hostname.pattern | Regex pattern to get hostname from output of the hostname command during device discovery | |
discovery.commands.version.command | Command to get version during discovery | |
discovery.model.match.regex | Match word or regex for output of version command during device discovery | |
enforcer.terminal.behaviour.context | This is for keeping the actual context in the device and the context in XML policies synchronized. ALCATEL and CISCO can locate deeper contexts when a user enters them sequentially in one command line whereas HUAWEI cannot. When a command does not exist in the current context, HUAWEI and ALCATEL looks for it in the root context whereas CISCO does not. | ALCATEL |
enforcer.terminal.behaviour.ctrl_c | This is for keeping actual context in the device and context in the XML policies synchronized. Devices have different behaviors when the user presses CTRL+C. DO_NOTHING: Does not change the context. ABORT: Ignores what the user wrote, does not change the context. ABORT_AND_GO_TO_ROOT: Changes the context as root. ABORT_AND_GO_TO_ROOT_WHEN_NO_COMMAND: Changes the context as root only when the user did not write anything. | ABORT |
enforcer.terminal.behaviour.ctrl_z | This is for keeping actual context in the device and context in the XML policies synchronized. Devices have different behaviors when the user press CTRL+Z. DO_NOTHING: Does not change the context. ABORT_AND_GO_TO_ROOT: Does not execute the command if the user wrote something, then changes the context as root. EXECUTE_AND_GO_TO_ROOT: Executes the command if the user wrote something, then changes the context as root. | ABORT_AND_GO_TO_ROOT |
enforcer.terminal.behaviour.error_message_pattern | This property is used to understand whether the command has executed successfully or is not in the command log entries. The expected failure message returned by the command needs to be defined in this property. | (command not found)|(Error:) |
enforcer.terminal.behaviour.exc_last_line_patterns | Skips command detection, policy enforcement and command logging when the last line matches one of these patterns. | .*(?i)password[:|>].* ^\s*-+\s*(?i)more\s*-+.* |
enforcer.terminal.behaviour.has_prompt | If the device type has no prompt like #,$, set the value as “false”. | true |
enforcer.terminal.behaviour.prompt_pattern | When the user presses ENTER, the system tries to find this pattern in the last line. If found, the system considers rest of characters as a command. | .*?(>|#|\]|\$) |
enforcer.terminal.behaviour.second_attempt_for_prompt | This is for the action for when the user presses ENTER but the command could not be detected because of no prompt being found in the last line. Sometimes while the user is typing a command, device may suddenly send some messages to user. In this case, characters of the command may be mixed with the characters of the message. So the actual command may not be detected when the user presses ENTER. DONT_TRY_AND_CLEAN_LINE: Sends specific byte series to the device in order to clean the line (guaranteed to cancel possible command). DONT_TRY_AND_SEND_ENTER: Sends ENTER to the device (may cause to execute a possible command without policy enforcement and logging). TRY_AND_CLEAN_LINE: Sends TAB to the device and waits for a short while. If still no prompt is found in the last line, sends specific byte series to the device in order to clean the line (guaranteed to cancel possible command). TRY_AND_SEND_ENTER: Sends TAB to the device and waits for a short while. If still no prompt is found in the last line, sends ENTER to the device (may cause to execute the possible command without policy enforcement and logging). | TRY_AND_CLEAN_LINE |
nsso.cli.delay.before.enter | For adjusting the delay time for the possibility of echo not coming from the device before the ENTER command. | 100 |
nsso.cli.delay.between.enters | Sometimes bulk commands which are copy/pasted aren't executed completely or some commands can be missed. The reason being that, some commands have a response time and the response time can be more than the expected time. Single Connect waits 500 milliseconds as default after each time the Enter command is echoed from the device. The value can change if it is not considered sufficient. | 500 |
shell.terminal.config.fixed_pty_columns | Some devices send ENTER bytes when the command being typed is longer than the window width. This causes problems with command detection. To avoid it, this property should be set as 0 (or -1, according to the device) in order to force the device to assume unlimited window width. Additionally, it can also be used for working with an always fixed window width like 80 columns, even if the user changes window width of the client application. | 80 |
shell.terminal.config.fixed_pty_lines | Forces the device to assume unlimited window height when this property is set as 0 (or -1, according to the device). Additionally, it can also be used for working with an always fixed height, like 24 lines, even if the user changes the window height of client application. | 24 |
shell.terminal.config.local.echo | This parameter must be set as true if the device-side keys are not echoed. | false |
shell.terminal.config.ssh.echo.process | When a performance raise is to be desired, the property value can be set as "with_queue" | WITHOUT_QUEUE |
shell.terminal.config.ssh.enable.bouncycastle | Some devices do not support up-to-date encryption techniques. For those devices, setting the value as "false" prevents performance loss. | |
shell.terminal.config.telnet.auth.failure.pattern | When the defined values in this property are caught after entering username/password in Telnet connections, authentication is considered as unsuccessful. | (?i).*(error|username[:|>]|user[:|>]|login[:|>]|password[:|>]).* |
shell.terminal.config.telnet.logon.template | In Telnet connections, some devices ask for the username and password at the same time when logging on. For devices with such behavior, this property must be defined. | lgi:op="${username}",pwd="${password}"; |
Manually Adding a Device
- Log in to the Single Connect Web GUI
- Navigate to Device Management > Device Inventory
- Click the “New Device Discovery” button
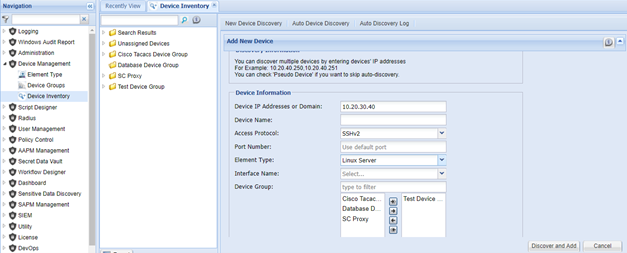
- Fill out the relevant device’s information and save by clicking “Discover and Add”.
Deleting Devices
- Log in to the Single Connect Web GUI
- Navigate to Device Management > Device Inventory
- Expand the Device Groups that include the devices to be deleted
- Click to select the device
- Press CTRL or Shift button and click additional devices
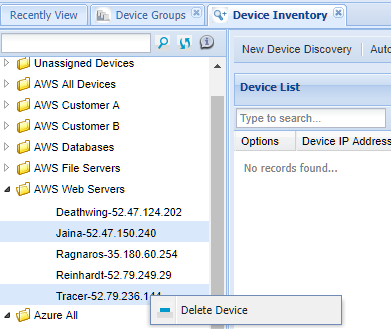
- Right-click one of the selected devices
- Click “Delete Device”
- Confirm the dialog box
Note |
|---|
The “aioc.device.available.interface.names” parameter must be defined at System Config Manager in order to select the interface name. |
Maintenance Mode Settings for Devices
- Log in to the Single Connect Web GUI
- Navigate to Device Management > Device Inventory
- Right-click on the device to switch maintenance mode on.
- Select the “Schedule Maintenance Time” option
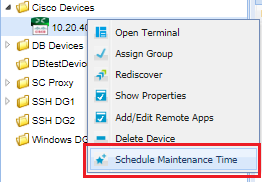
5. Set the maintenance time and the user authorized during that maintenance time
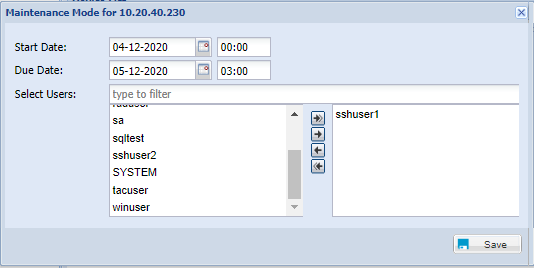
Note | |
|---|---|
Maintenance Policy Groups only applies to devices at maintenance time. Operations Policy Group doesn’t apply at maintenance time. See also: Policy Management-Policy Group | |
Defining Device Groups
- Log in to the Single Connect Web GUI
- Navigate to Device Management > Device Groups
- Fill out the “Device Group Name” field
- Fill out the relevant device group information and Save

Adding Device Group Properties
- Log in to the Single Connect Web GUI
- Navigate to Device Management > Device Groups
- Right-click the device group containing the device of interest and select “Show Properties”
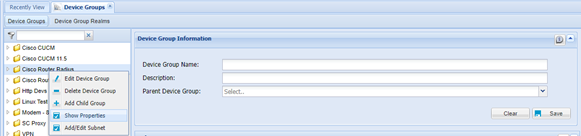
4. On the “Device Group Properties Information” screen, select the required property keys, enter the related values and save
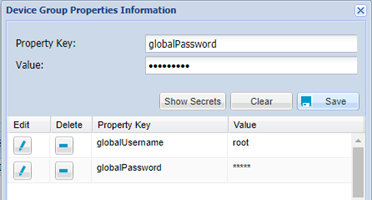
Property Key | Definition |
|---|---|
globalUsername | The username to use when connecting to all devices covered by the device group. This username must be pre-defined as a user on all devices in the device group. |
globalPassword | It is the password of the globalUsername The password to use when connecting to all devices covered by the device group. |
globalSshKey | This property only applies to SSH Proxies in Session Manager Modules. If connecting to the device with an SSH Key is preferred, “globalSshKey” should be defined for the Device Group. |
globalSshKeyPassphrase | This property only applies to SSH Proxies in Session Manager Modules. If the device to be connected has an SSH passphrase, “globalSshKeyPassphrase” should be defined for the Device Group. |
globalSecretKey | This property only applies to the TACACS+ Access Manager Module. The secret key to use when authenticating all devices covered by the device group to TACACS+ servers. It is a mandatory property when using the TACACS+ Access Manager. |
globalEnablePassword | This property only applies to the TACACS+ Access Manager Module. Bot/script users need to use a common password for switching to “enable mode” in scripts. The "globalEnablePassword" property allows to set a common password for a device group to be used when enable password is prompted. |
useAsRoleGroup | Some devices can be defined in multiple device groups. In this situation, device authorization can be defined on one device group. The “useAsRoleGroup” device group property value must be set as “true” for the device group in which authorizations are managed with policy enforcement such as black key/white key. |
showInDeviceTree | When its value is set as “false”, the device group cannot be seen in the device inventory screen. This property is used with the “useAsRoleGroup” property. After devices are authorized with the main device group, this property can be set for the device group. Then, users cannot see this device group in their device inventory. Users that have the same authorization level as the device group, defined by the group role can still only see the other device groups. |
sapmMailList | When the following situations occur in SAPM, “sapmMailList” is notified. •When a user retrieves a password for an SAPM account that is in the device group •If an error occurs during resetting the password of an SAPM account that is in the device group •If the password cannot be verified while checking the password of an SAPM account that is in the device group •If a new user is detected on a device that has an SAPM account that is in the device group |
addSessionUserToUserSelection | This property only applies to SSH/TELNET Proxies and RDP/VNC Proxies in Session Manager Modules. When the “addSessionUserToUserSelection” property is set as “true” on a device group, users can connect to target devices in the device group with their own username that is used to log in to Single Connect. |
addManualLoginToUserSelection | This property only applies to SSH/TELNET Proxies in Session Manager Modules. Default value is “false”. When the value is set as “true”, the user can enter the device username and password manually. |
addDeviceSshKeyToUserSelection | This property only applies to the devices that are imported from AWS (Amazon Web Services). If the value is set as “true”, connecting to devices with an SSH key is offered as a connection option. This property can be used when the following conditions are set: 1. The “sshKeyName” and the “sshUsername” property keys should be defined in the device properties for preferred devices. 2. The SSH Private Key corresponding to the “sshKeyName” in the device property should be defined in the Secret Data Vault. |
approvalRequiredForConnection | This property only applies to SSH Proxies and RDP Proxies in Session Manager Modules. When its value set as “true”, managerial approval via e-mail is requested for users to connect to devices in the device group. |
Device Group Properties
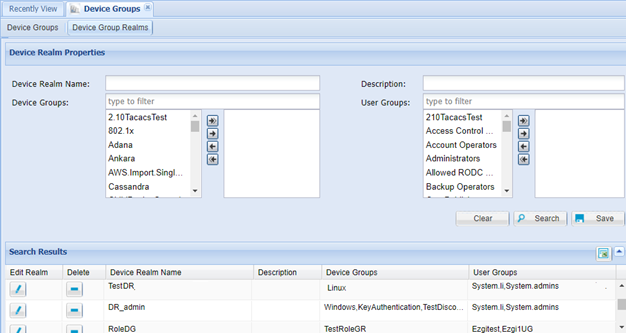
Defining Device Group Realms
- Log in to the Single Connect Web GUI
- Navigate to Device Management > Device Groups
- Open the Device Group Realms tab
- Pick a Device Group name from the “Device Group” list on the right, pick a User Group name from the “User Group” list from the left and Save
Now a new “Device Realm” has been created by matching a device group with a user group.
Auto Device Discovery
Auto Device Discovery can be used to scan a network subnet or existing devices in device groups.
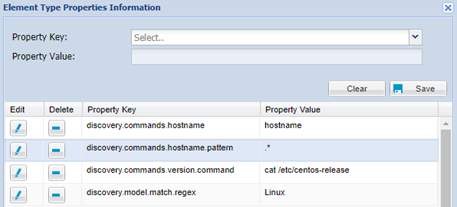
Some parameters should be added to related element types to discover devices.
- Log in to the Single Connect Web GUI
- Navigate to Device Management > Element Type
- Select an Element Type to set required parameters and click the “Options” button, then the “Show Properties” button.
- Set the following parameters:
discovery.commands.hostname: command to get hostname
discovery.commands.hostname.pattern: regex to get hostname from output of the hostname command
discovery.commands.version.command: command to get version
discovery.model.match.regex: match word or regex for output of version command
Global username/password and/or subnet addresses should be set on device groups.
Global username/password to discover subnet or existing devices:
- Log in to the Single Connect Web GUI
- Navigate to Device Management > Device Groups
- Right-click on the device group to be discovered and select “Show Properties”
- On the “Device Group Properties Information” screen, select “globalUsername” and “globalPassword” as the “Property Key”, enter the related information, then Save each property.
Adding Subnet to discover subnet:
- Log in to the Single Connect Web GUI
- Navigate to Device Management > Device Groups
- Right-click on the device group to be discovered and select “Add/Edit Subnet”
- Set subnet information and Save
Auto discovery steps:
- Log in to the Single Connect Web GUI
- Navigate to Device Management > Device Inventory
- Open the Auto Device Discovery tab
- Fill out the relevant device discovery information and click Discover
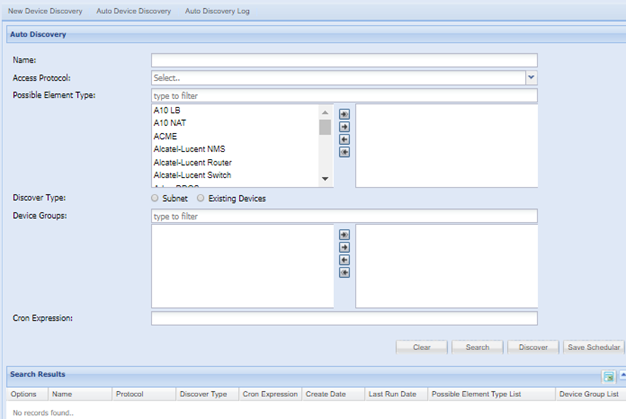
To schedule discovery:
5. Fill out relevant device discovery information and click “Save Scheduler”
Access Protocol: Protocol to discover devices. If SNMP protocol is selected, protocol to change after discovery should be selected.
Possible Element Types: Possible element types in search range. Devices will be matched in these element types.
Discover Type: If “Subnet” is selected, the subnet of device groups is scanned. If “Existing Devices” is selected, existing devices in the selected device groups are scanned for changes.
Cron Expression: If user wants to scan periodically, a cron expression should be entered.
Active Directory Device Discovery
LDAP or Active Directory devices can be integrated with Single Connect. Some properties must be added from the System Config Manager for discovery configuration.
- Log in to the Single Connect Web GUI
- Navigate to Administration > System Config Man.
- Enter the related configuration parameters
Parameter Name | Parameter Value |
|---|---|
sc.device.integration.ldap.url | Mandatory ldap://***.***.***.***:**** Ex: ldap://10.20.30.40:389 |
sc.device.integration.ldap.eid_0 | Mandatory |
sc.device.integration.ldap.password_0 | Mandatory |
sc.device.integration.ldap.source.name_0 | Mandatory |
sc.device.integration.ldap.root.device.group_0 | Mandatory |
sc.device.integration.ldap.baseDN_0 | Mandatory DC=******,DC=***** Ex: DC=kron,DC=test |
sc.device.integration.ldap.device.group.search.phrase_0 | Mandatory Ex: (cn=Cert Publishers) |
sc.device.integration.ldap.device.search.phrase_0 | Mandatory Ex: (objectClass=computer) |
sc.device.integration.ldap.device.ip.attribute_0 | Mandatory dNSHostName |
sc.device.integration.ldap.device.hostname.attribute_0 |
|
sc.device.integration.ldap.device.element.type.id.attribute_0 |
|
sc.device.integration.ldap.device.access.protocol.attribute_0 |
|
sc.device.integration.ldap.device.port.attribute_0 |
|
sc.device.integration.ldap.device.default.access.protocol_0 | Mandatory Ex: RDP |
sc.device.integration.ldap.device.default.element.type.id_0 | Mandatory Ex: windows_7 |
sc.device.integration.ldap.device.default.port_0 |
|
Adding Devices Automatically
A job running periodically on Single Connect synchronizes user groups and devices from Active Directory. This job checks the changes made to Active Directory since it is last run, and updates Single Connect accordingly.
Manually Trigger LDAP Sync Job
LDAP Sync Job can be manually triggered.
- Log in to the Single Connect Web GUI
- Navigate to Administration > Jobs Scheduler
- Click "Trigger List"
- Click the “Trigger as Simple Trigger” link on the “LdapDataCollector” line.
Bulk Import
Devices can be added in bulk to Single Connect. For this adding method follow the steps below:
- Log in to the Single Connect Web GUI
- Navigate to Administration > Bulk Import
- Click on the “Download Template” link to create a bulk device list
- Fill the downloaded Microsoft Excel file template with device list and save it in your computer
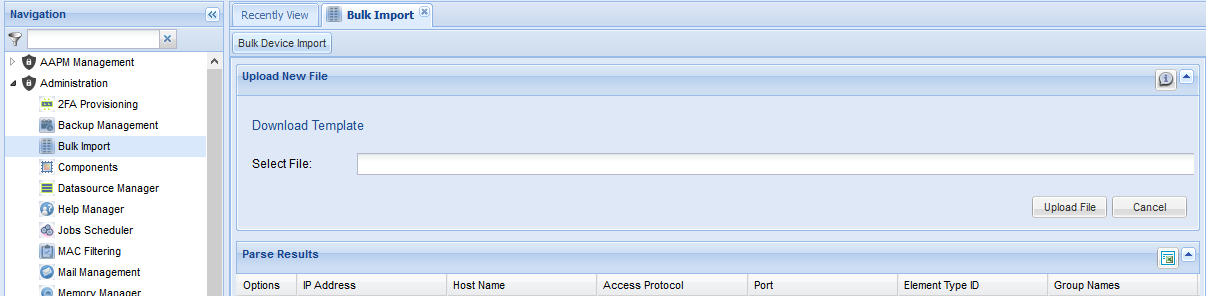
5. Select the device list file and click “Upload File”
After these steps, the device list is added into the Parse Result Section of the Bulk Import Screen
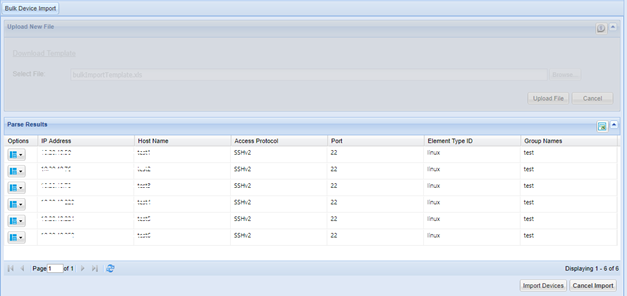
6. Click “Import Devices”
The devices are added to the related Device Group in the Device Inventory
Rules to Fill Bulk Import File:

- Ip Address, Hostname, Access Protocol, Element Type ID Group Name(s) are mandatory areas.
- One device must be defined in a row. If it needs to be defined in multiple device groups, it should be separated by a semicolon (;). Ex: DeviceGroup1; DeviceGroup2; DeviceGroup
- Device group names cannot contain the forward slash punctuation (/).
- Device group names should be unique.
- A device group cannot have both device group and device. Only the child group that is at the bottom of the device group tree can have devices.
- The parent and child device group can be added by separating the parent device group from the child group with a forward slash (/) in the “Group Name(s)” field of the file.
Ex: When adding a device to “ChildDeviceGroup3”, the group name field can be filled in the following ways:
- /ParentDeviceGroup/ChildDeviceGroup1/ChildDeviceGroup2/ChildDeviceGroup3
- ParentDeviceGroup/ChildDeviceGroup1/ChildDeviceGroup2/ChildDeviceGroup3
- ChildDeviceGroup1/ChildDeviceGroup2/ChildDeviceGroup3
- ChildDeviceGroup3
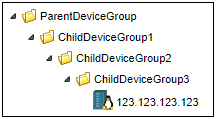
7. If there is a forward slash (/) punctuation at the start of the device group path, the first device should be the parent device group.
Ex: When adding a new device to the current device group “ParentDeviceGroup/ChildDeviceGroup1/ChildDeviceGroup2/ChildDeviceGroup3”, if “/ChildDeviceGroup2/ChildDeviceGroup3” is written in the “Group Name(s)” field, the import operation will fail because “/ChildDeviceGroup2” is not a parent group.
8. The Device Group path that is written in the “Group Name(s)” field can contain up to 10 device groups with parent and child relationships.
Ex: DG1/DG2/DG3/DG4/DG5/DG6/DG7/DG8/DG9/DG10
9. If the device group path that is written in the “Group Name(s)” field does not exist in Single Connect, the device group path is created and then the devices are imported in this path.