Managerial Approval Connection Reservation
For devices that require managerial approval for RDP/SSH/SFTP/HTTP proxy connections, users can make reservations for future dates to get their approvals before the planned activity. To make a reservation for a single device, follow the steps below:
- Navigate to Devices > Inventory > Reservation tab.
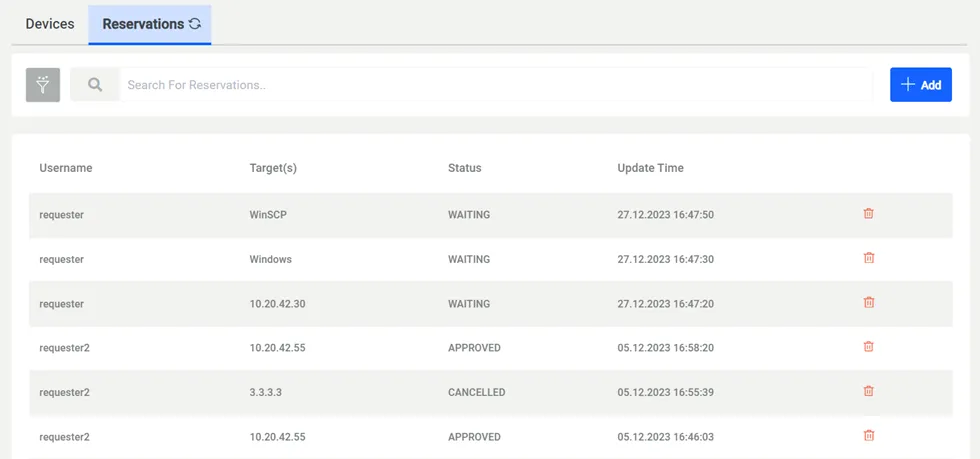
- Select Target Type as Single Device by clicking the + button.
- Start typing the host info in the Host field and select the device that appears in the search results.
- Select a connection username if the reservation is specific to a connection username, then click the Add button.
- By default, users can enter a description in the reason field; this field is optional. However, if desired, this field can be made mandatory by using the system parameter aioc.connection.reservation.reason.required. You can find the details of this parameter in APPENDIX 1: System Config Manager Parameters
- To add more devices to the reservation target list, repeat steps 2 to 4.
- With the Next button, Select Time Start and Time End and click Add Reservation.
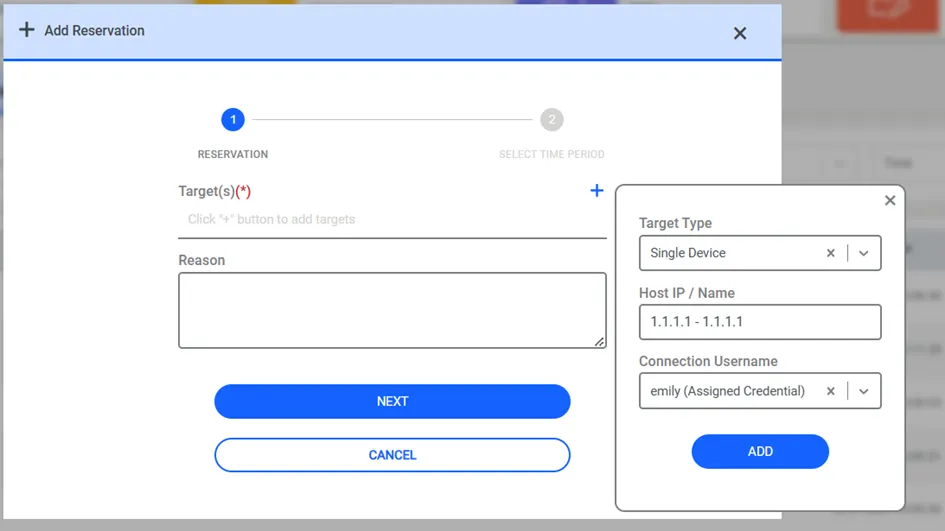
You can also add a Device Group to your target selection. To add a Device Group, follow the steps below:
- Navigate to Devices > Inventory > Reservation tab.
- Select Target Type as Device Group after clicking the plus + button.
- Start typing the host info in the Host field and select the device group that appears in the search results.
- Select a connection username if the reservation is specific to a connection username, then click the Add button.
- By default, you can enter a description in the reason field; this field is optional. However, if desired, you can make this field mandatory by using the system parameter aioc.connection.reservation.reason.required. You can find the details of this parameter in APPENDIX 1: System Configuration Manager Parameters under the relevant section.
- To add more device groups to the reservation, repeat steps 2 to 4.
- With the Next button, Select Time Start and Time End, and click Add Reservation.
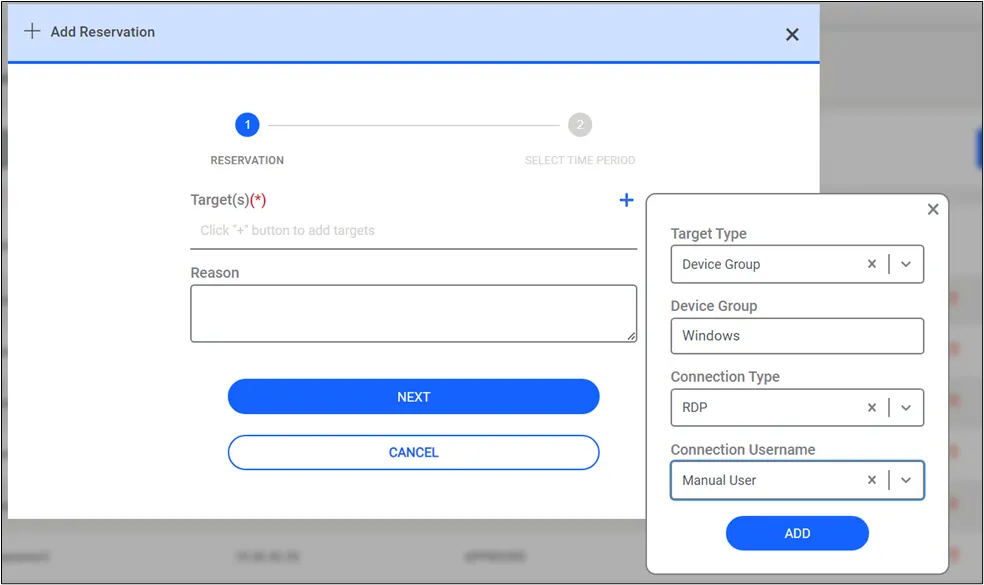
Instead of a Device, a Remote Application can also be added to the connection Reservation (see Auto Login Feature for RDP Remote Applications for more details). To add a Remote Application, follow the steps below:
- Navigate to Devices > Inventory > Reservation tab.
- Select Remote Application as the Reservation Type after clicking the plus + button. Remote App Name, RDP Server, Remote App User, and Connection Username fields will appear.
- Select the name of the remote application from the Remote App Name combo box.
- The RDP devices in the device groups for which the selected remote app is enabled will appear in the RDP Server combo box.
- Select one of them, or all of them to specify on which server the Remote App connection is to be established.
- The usernames available in the Remote Application auto-login process will appear in the Remote App User combo box.
- Select one of them, or all of them to specify which remote app user will be used during auto login.
- The usernames enabled for the RDP server itself will appear in the Connection Username combo box. Select one of them, or all of them.
- Optionally type a description in the reason field.
- To add more remote applications to the reservation, repeat steps 3 to 8.
- With the Next button, select Time Start and Time End and click Add Reservation.
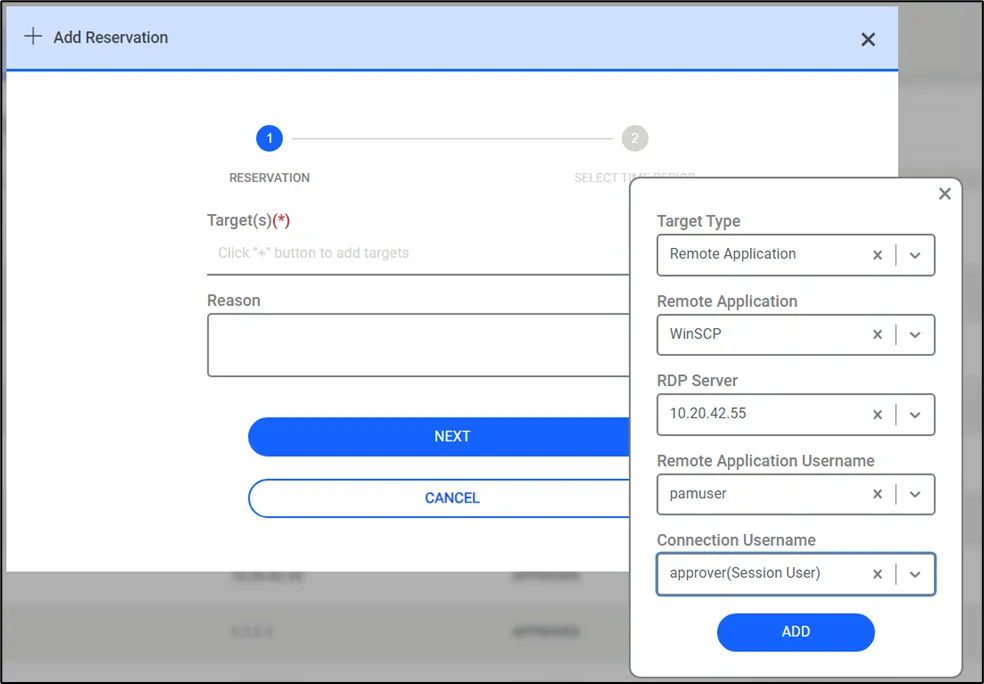
Any connection reservation request can include multiple Single Devices, Device Groups, and Remote Applications all at once.
User group managers can make reservations on behalf of the members of their groups. To enable this ability, the Reservation on Behalf of Group Member function group must be added to the Portal Functions of the User Group. After adding the function group, a field called For User appears in the Connection Reservation tab when the group managers log in.
After completing these steps, the reservation record will appear in the My Approvals list on the dashboard, and the manager responsible for approvals will receive the approval request email. Both the search results and the email include an Approval ID number. This number can be used when searching for reservations in My Approvals, Reservations, and Logging screens. If the manager approves the request, the user can connect to the device(s) with the connection username within the specified reservation times. If the manager does not approve or reject the request before the reservation end time, expired requests are indicated on the My Approvals list by showing an Expired status for such requests.
When you want to start the connection reservation process via email, the manager receives an email that includes this header:
<instanceName> - Connection Reservation Approval Notification - #<approvalID>
If you want to enable Expiry Notification of connection reservations, the aioc.connection.reservation.expiration.alert.before.values parameter should be saved as number of days on the System Config Manager. Thanks to this parameter, users can submit reservation requests again to extend the connection end time.
If the allow.changing.reservation.time.by.approver system parameter set as true, the approver will be able to change the reservation time (start time and/or end time) during approval and Kron PAM will notify the requester of the time window change.
Users should configure the kill.session.on.reservation.end parameter in the System Configuration Manager screen to ensure that sessions are terminated after the specified reservation time ends. For more details about this parameter, please refer to APPENDIX 1: System Config Manager Parameters
Users can be prevented from submitting reservation requests that exceed a certain duration (e.g., 90 hours/days) when requesting approval through Kron PAM. If the aioc.connection.reservation.max.allowed.hours is defined (e.g., 2160 hours = 90 days), users will not be able to submit reservation requests that exceed this limit. When a user enters a duration beyond the limit on the reservation screen, the following warning message will be displayed: "Requested approval duration exceeds the allowed limit of 90 days.”