RPAM Connector Configuration
The following steps should be read carefully to successfully install RPAM Connector on the regarding machine:
Check the Secure Reboot Enabled status before the installation by running the mokutil --sb-state command.
In case Secure Boot is enabled, it might cause an error during the Wireguard installation. Please disable it to continue the installation!
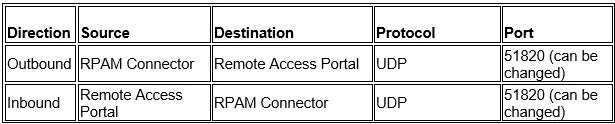
The firewall rules that must be configured on the network-level firewall protecting the network segment where the RPAM Connector is deployed (for example: perimeter firewall, DMZ firewall, cloud network firewall). These following rules apply to the network firewall in front of the RPAM Connector, not to any host-based firewall running on the RPAM Connector server itself.
Required Firewall Rules on the Network Firewall Protecting the RPAM Connector
1) WireGuard Tunnel Traffic (UDP)
Allow the RPAM Connector to initiate the WireGuard tunnel to the Remote Access Portal.
2) Forwarded Traffic to PAM Server
Allow traffic forwarded by the RPAM Connector to reach the PAM Server.
*** Stateful Network Firewall (Recommended and Most Common)
Stateful firewall examples include enterprise and cloud firewalls such as Palo Alto Networks, FortiGate, Check Point, Cisco ASA/FTD, Juniper SRX, and AWS Security Groups.
Required Rule:

*** Stateless Network Firewall
In stateless firewall environments, traffic is evaluated per packet and connection state is not tracked.
Required Rules:
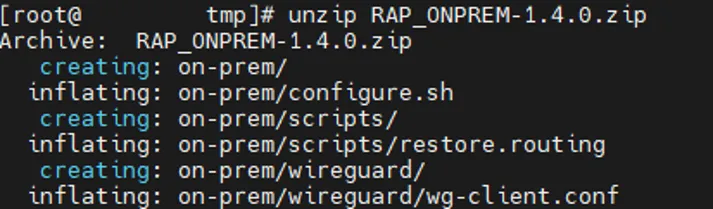
1. Download the RPAM Connector’s installation script on the machine that will be used for RPAM Connector. The support team can provide the installation script. After downloading the script, unzip the installation script on the machine. The user can use unzip command to extract the files from the installation script file.
Linux CLI | [root@con~]# unzip RAP_ONPREM-1.4.0.zip |
|---|
In case of bash: unzip: command not found error being shown, the unzip package should be installed with the sudo dnf install -y unzip command.
If it becomes necessary to start the script again for any reason (such as because of a wrong input or a missing file etc…), please remove all installation files except the compressed RPAM Connector installation script, and unzip the compressed installation script file again. After this you can execute the script.
We highly recommend this method since the extracted files might be modified after the script execution for the first time, and executing the script with modified files might cause the faulty installation!
2. Navigate to the on-prem directory:
Linux CLI | [root@con~]# cd on-prem/ |
|---|

3. Run the configuration script:
Linux CLI | [root@on-prem~]# sh configure.sh |
|---|

In case the script fails to run because of insufficient file permissions, run the chmod +x configure.sh command.
You need root privileges to run this script.
4. The RPAM Connector’s installation script should be restarted after the forced reboot. The installation script asks user either:
a. For the first-time installation on the premise, the whole RPAM Connector should be configured from scratch, thus, the first option should be selected by entering 1 and pressing the enter key.

The RPAM Connector’s installation script asks several configuration details:
o The Wireguard IP address that will be assigned to RPAM Connector’s side,
o Public IP address of Remote Access Portal (RAP) environment,
o The port number of Wireguard,
o The IP segment of Wireguard,
o The public IP address of Kron PAM,
o The public IP address of RPAM Connector,
o A public key generated by the Remote Access Portal (RAP)’s script.
Below are the example values for the RPAM Connector configuration.
Connector Configuration Descriptions | Example Values |
|---|---|
Wireguard IP address that will be assigned to the RPAM Connector’s side | 10.0.0.2 |
Public IP address of Remote Access Portal (RAP) environment | 54.173.245.231 |
The port number of Wireguard | 51820 |
The IP segment of Wireguard | 10.0.0.0/29 |
The public IP address of Kron PAM | 10.20.42.129 |
The public IP address of RPAM Connector | 10.20.42.17 |
A public key generated by the Remote Access Portal (RAP)’s script | FtWtEku3ge6YrhJ8SSwm279kdrkM/5L8ISjaJWYYEg0= |
After all information is filled in, press y to continue. If you fail to fill in each field successfully (either missing or wrong info), you can press n to reenter information again.
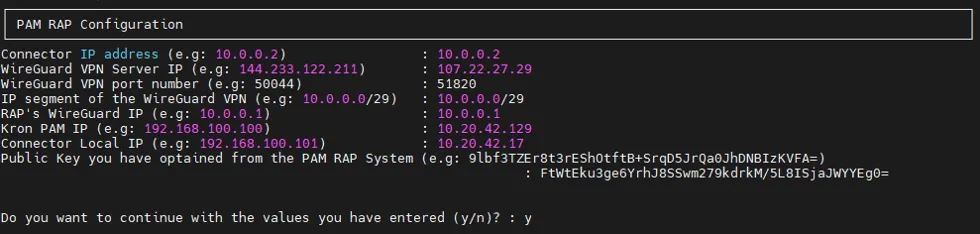
Once the RPAM Connector installation asks for the public key, if you don't know the public key generated by the Remote Access Portal (RAP)’s installation script yet, you can set a temporary public key for now (e.g., 9lbf3TZEr8t3rEShOtftB+SrqD5JrQa0JhDNBIzKVFA=).
But please do not forget to set the public key by using the RPAM Connector’s script (please check 4.b of this section below), after the Remote Access Portal (RAP)’s script generates a public key.

At the end of RPAM Connector’s script, the public key generated by this script is ready to use on the Remote Access Portal (RAP) environment (e.g., g1Zi8fXMN0tGprF518mZ7f/Bk1NpasneBSpmBOKd2TA=).
Please do not forget to add this info on the Remote Access Portal (RAP) environment by using Remote Access Portal (RAP)’s installation script (please check 6.b at the previous page).
b. Once the RPAM Connector has been fully installed, only one configuration is missing here regarding public key that would be generated by the Remote Access Portal (RAP)’s installation script. If the user executes the Remote Access Portal (RAP)’s installation script on the cloud (please, check 6.a at the previous page), it generates a public key which would be used in the RPAM Connector here, thus now this option can configure the secure tunnel configuration file with the generated public key from Remote Access Portal (RAP)’s side.
The user should select the second option by entering 2 and pressing the enter key.

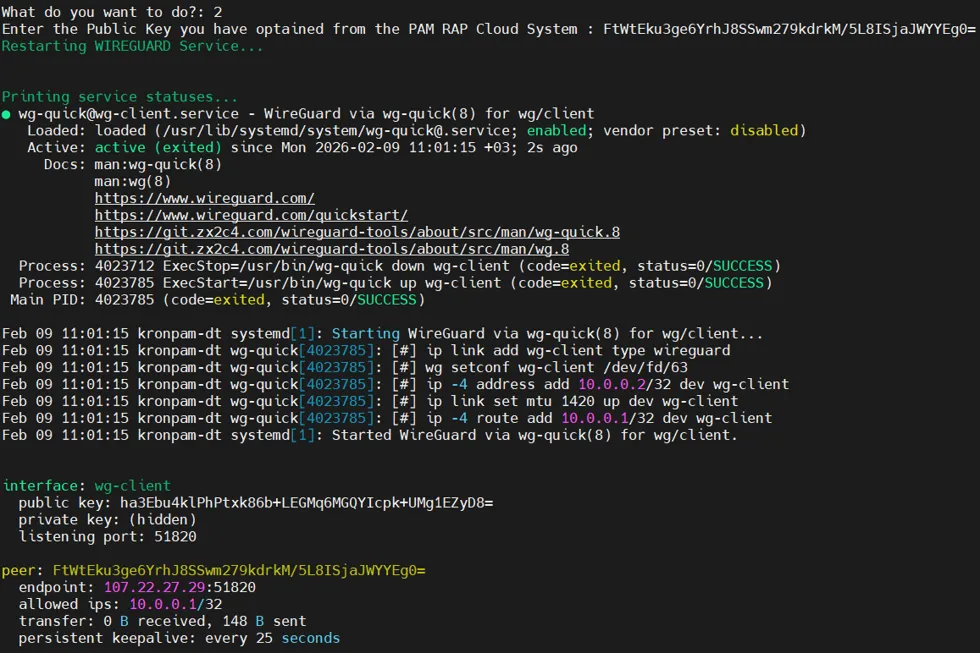
Set the public key data of the secure tunnel configuration file with a public key generated by the Remote Access Portal’s installation script
(e.g., FtWtEku3ge6YrhJ8SSwm279kdrkM/5L8ISjaJWYYEg0=).