Auto-Login Feature for Kron PAM HTTP Proxy
The HTTP Proxy is used mostly for Auto-Login functionality. With the Auto-Login feature, users can log in to the web page with credentials invisible to them and all other users. This helps companies manage their social media web pages or other web applications that need a login procedure.
The Auto-Login function finds the text fields on the web page and fills them with the global username and global password values. These Global credentials need to be configured in the device group properties. To configure the Global credentials, follow the steps below:
- Navigate to Devices > Inventory.
- Click the Options button on the right side of the device group containing the web page.
- In the pop-up, select the edit option. Then skip to the properties section.
- Enter the username of the web page user in the Value section and Save.
- Enter the password of the web page user in the Value section and Save.
To configure Auto-Login:
- Navigate to Devices > Elements.
- Use the Advanced Search button (filter icon) to search for elements or select the related web page element created before. a. If you want to create a new Element, click the add button and fill in the blanks.
- Click the green button to open a pop-up screen. Then click edit element type to edit the properties of the element type.
- Fill in the element type properties.
Element Type Property | Explanation |
|---|---|
http.auto.login.password.matcher.template | This parameter is used to find and replace the password with the global password. |
http.auto.login.post.url | Web application/site login URL. Regex can be used to define the URL property. Example: /login/device-based/regular/login/.* |
http.auto.login.username.matcher.template | This parameter is used to find and replace the username with the global username. |
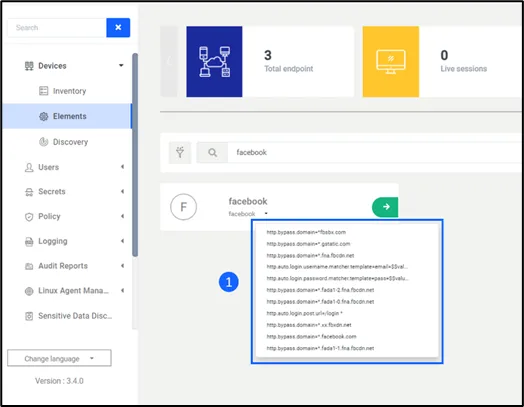
http.bypass.domain | Web applications/sites can use multiple domains for images, chats, emails, etc. If you do not add these domains to the whitelist, the web page will not be shown as is. Some images, videos, etc., will be blocked because of the improper HTTPS certificate. |
To better understand these element properties, let’s inspect an example of a Facebook login:
- Open facebook.com in a web browser.
- Right-click on the screen and click Inspect.
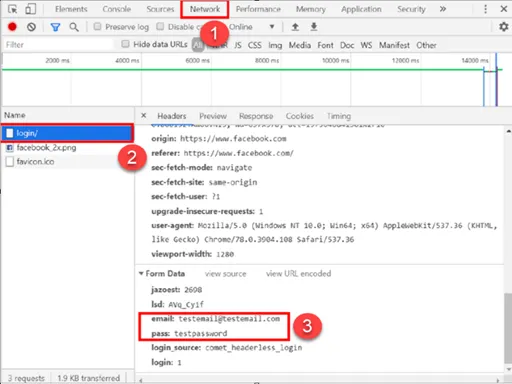
- Click the Network tab on the top of the screen.
- On the Facebook Login screen, enter a test email and test password, and then click Login. Facebook will return an error because the test credentials are incorrect.
- Look in the inspection code to find the test email and password. Check the parameter’s name and configure it in the element type properties. a) On the left column, there are post URLs. These should be configured in the HTTP.auto.login.post.URL parameter for Facebook. It is login so the HTTP.auto.login.post.URL parameter will be defined as /login.*. The regex characters are needed since there could be other sub-pages. Therefore, the post URL always finishes with “.*”. b) Now, look for the test username and test password in the inspection code post URL. The test username and password are posted under specific containers in the login URL. In Facebook, these parameters are email and pass. These parameters will be defined in the HTTP.auto.login.username.matcher.template parameter as email=$$value$$(&|$) and in the http.auto.login.password.matcher.template parameter as pass=$$value$$(&|$). These parameters will be used in the Element type. If these parameters are different, only the red pass and email part of the parameter definition should be changed. The other part, “=$$value$$(&|$)” should remain the same in the definition.

- To apply all changes made in the element type, you need to restart the HTTP Proxy. Restart the HTTP Proxy from the Kron PAM CLI. Establish an SSH connection to Kron PAM as root and run the command below. systemctl restart http_prox
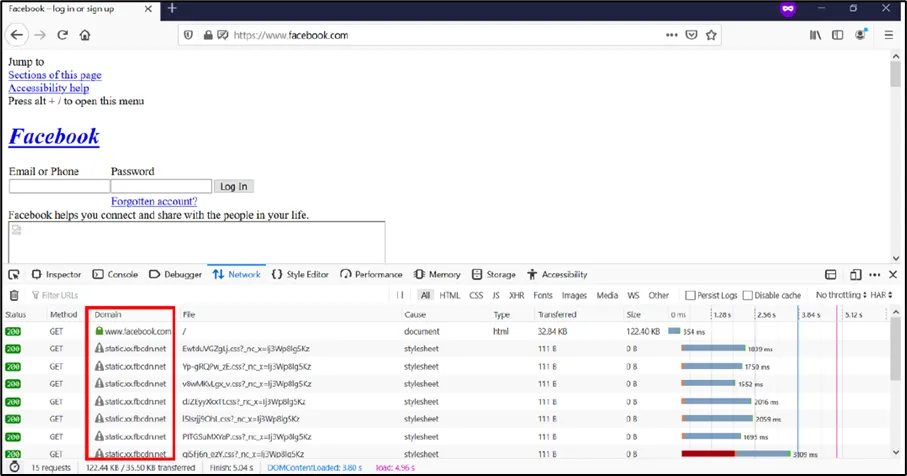
- The last element type property is the HTTP.bypass.domain. These are external domains from which the main web page loads some data and elements. Use the Firefox browser to find the bypass domains. Open the Facebook web page by using an HTTP Proxy on Firefox. The web page will be loaded incorrectly. Frames can be different, photos will not be shown, etc. It means that some information or data coming from another domain is blocked because they are not allowed. These domains are what we call bypass domains.
- Right-click on the screen and click Inspect.
- Click the Network tab and check the Domain column.
- If there are any domains other than facebook.com, you need to add these domains as bypass domains. This step should be repeated after the login page or any other page to find all bypass domains.

- After adding all the bypass domains to HTTP.bypass.domain, you must restart again with the command below. systemctl restart http_prox
- Configure all these parameters in the Element Type Property as outlined in the following figure.

Changing the Keyword Password
The auto-login mechanism works when the username/password field is empty, or an auto-login keyword text is entered. Some websites allow the username/password field prompt to be empty, and you can click the Login button, but other websites do not allow this. The auto-login keyword default value is !auto. When entered in the username field, HTTP Proxy gets the credentials from Kron PAM. You can change this keyword as described below:
- Establish an SSH connection to the Kron PAM server.
- Run the commands below for the configuration. cd /u01/sc-HTTP-proxy vi proxy.properties
Edit/add the parameter below. Give any desired keyword instead of !auto. HTTP.proxy.auto.login.username.specifier=!auto Save the file and exit from the vi editor.
3. Restart the HTTP Proxy with the command below.