Authenticating to HTTP Proxy
2 min
To use HTTP Proxy through a web browser, you need to make the required configurations described in the Web Browser Configurations for HTTP Proxy in the web browser. After making these configurations, requests (and responses) to all web pages to be accessed via the corresponding web browser are routed through the HTTP proxy.
If an HTTP proxy is configured, the HTTP Proxy publishes an authentication page over the HTTPS protocol. At the beginning of the session started by the client browser, the following authentication page always returns in response to the request.
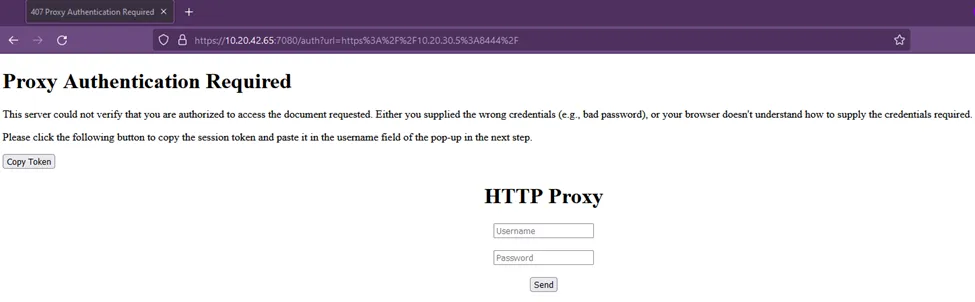
- Open the web browser on the proxy configured endpoint.
- For smooth authentication, first, copy the token provided by HTTP Proxy with the Copy Token button. You will paste it to the Username field in Step 4.
- Now enter the credentials in the Username and Password fields and then click Send.
- In the next pop-up, enter the token you copied to the authentication name field, and you will be authenticated to the HTTP Proxy.
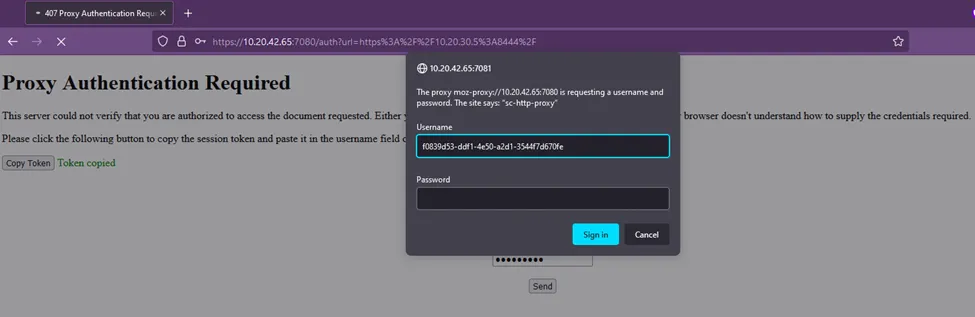
The input token value is used by HTTP Proxy to maintain session control.
- If MFA is enabled on the HTTP proxy, the OTP must be submitted to the HTTP proxy for successful authentication, even if the same user credentials are used in a different browser.
- If you want to force authentication again after a specific time, you can define the http.proxy.websocket.idle.timeout.min parameter in System Config Man. This parameter forces the HTTP Proxy to drop the session when the client passes no traffic. The default timeout value is 10 minutes.
- If SSL Mode is enabled on HTTP Proxy, basic authentication is used as session-id cannot be used. See HTTP Proxy SSL/TLS Mode for more information.